Pages

Sunday, December 13, 2009

Baby Shower, Awards and a Wedding

Hi all we just had a baby shower for my niece and her husband and though i would show some of the things i made for them. this card was made using a 1 and 3/8" circle punch, a small clip lock bag, a tiny rubber baby, some hair gel and a template found here. I found this link for tiny plastic babies , and also this link. A touch bulky but just the right amount of hair get seemed to work pretty good, just make sure you tape all you layers down well. A close up......

so cute hey! i also made a nappy cake and one to eat for them...her sister had the cute little icing baby made for the top of the cake.


and while were on the subject of family i cant help but mention the achievements of our kids this year....our youngest daughter Madaleine was awarded excellence in food technology coming first in her class for yr 8, 2009 and also was awarded a scholarship to the value of $853 for 2010 school fees. so proud of her! xx

Our oldest daughter Beth finished her certificate 4 in christian counseling in pastoral care and is off to uni next year to start primary teaching! she has also done a week as a Red frog
volunteering as a hotel Chaplin for the shoolies week here in Byron Bay well done Beth XX

Ben has just entered his last year of schooling doing 1 term already and has just bought himself a new car which he's so proud of. He was also awarded an $853 scholarship for 2010. they have all achieved and grown so much this year and we are very proud of them as their parents. love you all XX

And the family fun doesn't stop there....we also attended my twin sister wedding on the Gold coast and had a great day..... these are the belly bands i made for their invites .... all made with paper frangipanis done with a small balloon punch


and i made this card and picture frame as a wedding gift..........


this is me and my twin sister Michelle..... So wow its been a crazy year 3 weddings a funeral, 2 baby showers kids growing up working through panic attacks, the perfect holiday and God has blessed us abundantly! no doubt about it! i hope and pray He has for you too!

and a last thought

"Its in Christ we find out
who we are, and what
were living for".
Philippians 1:11

Thursday, December 3, 2009

how to make half window cards in the cuttlebug

Hey all, the Christmas season is really upon us now and i though i better make a post here and get my head out of Great Keppel's sunny skies and clear blue water......ahhh stop rambling...lol..no seriously here is a card you might like to try. i seen this done in a Big Shot machine with stampin up dies by sizzix called movers and shakers (click here to what the video)and really liked the concept, which got me thinking how i could make this in my cuttlebug.....so heres what i came up with... ill post some more Christmas cards soon...Valita


and a last thought

As long as the earth endures,
seedtime and harvest,
cold and heat, summer and winter,
day and night will never cease.
Genesis 8:22

This card was made By Carol ! another idea using this method so think outside the box and use some of your other die shapes! thanks Carol :)

Wednesday, October 21, 2009

Scrunched Flowers

a quick video tutorial for you.....want to see the finished card ? go here....have fun ...Valita

Tuesday, October 20, 2009

Folded Card Front / video tutorial

Hi all, my head is so busy at the moment as we are packing to go away for a 10 day holiday to Great Keppel Island....off the north Queensland coast of Australia.....it's so exciting, we've had this planned now for a while as something spacial to celebrate our 20th wedding anniversary. strange how when we are the busiest we seem to get heaps done....sooo i wanted to leave you all with this tutorial for you all to try while im away. One of the ladies from my card making group bought this idea along to show me, I think its a nice change form the regular flat card fronts and looks great as a Christmas card idea. Ill post the pattern below...To make the poinsettia flower I used a large maple leaf punch cut into sections and a 1/2" circle punch to mount it on (not shown here).


I have circled the stamp i used and shown you here where to cut the leaf in sections for the flower, punch 3 leaves and cut each one in this way then mount then on the 1/2" circle punch. to add glitter to the swirly stamp i used a quickie glue pen and traced the swirls then added glitter.


Hers's another one i made. I added some more emboss lines around the edges and attached this cute little flower i learned to do by layering up 2-3 large flowers and 2 smaller ones. sponge some colour on them and put a brad through them all. Spray them with water and crunch each petal up how you would like it to sit and let dry. This works really well and dries quite hard. I then sponged a little more colour on it and added some glitter. And Ive also done a video of this card front as we all know we learn much easier by watching someone else do something.. i hope you all enjoy and catch you all when we get back!!....Valita


this ones in inches


and a last thought


Those who plan what is good
find love and faithfulness
Proverbs 14:22

In his heart a man plans his course
but the Lord determines his steps
Proverbs 16:9

Monday, September 28, 2009

little Blue dog

Hi all im excited to share with you my new little punch doggie...isn't he so cute!! i got this idea from a stamp set called beary special by taylored impressions and though i could make this little guy from my punches.....so here he is! some instruction would help too ! LOL

Head 1 and 1/4" circle
Body 1 and 3/8" circle
Muzzle, cut an arch from the 1 and 1/4" circle
legs small oval
Ears small oval
Tail double punched from the small oval
Paws 1/2"circle cut in half
Nose 1/8"circle
Bowl small oval which is double punched for the rim
House 1 and 1/8" square
Roof is half of the 1 and 1/8" square
house opening is half small oval
and the bone and grass were also punches
all these were lightly sponged with black ink

It's easiest if you make the head and ears first then mount that on with foam tape...i also did a video tutorial on him so have a look and see how he was put together....have fun Valita


and a last thought

Tell those who are rich not to be proud
and not to trust in their money,
which will soon be gone, but there
pride and trust should be in the living God
who always richly gives us all we need
for our enjoyment.
1 Timothy 6:17

Thursday, September 24, 2009

Our 20th Wedding Anniversary

Hi all, today was our 20th Wedding Anniversary. our kids bought us home a cake from the bakery where Beth works others goodies and we had a nice meal together in our new garden...then lit the chimnea to roast some mash mellows...Dave bought us a gorgeous plaque for the garden and lots of nice smelly things for me ....hehheh! he is such a loving and supportive husband and a great Dad! weve been together over half our lives now and God has blessed us so much.
we have a weeks holiday booked (just me and Dave) for the end of Oct to Great Keppel Island ...can't wait to relax together...some pics....Valita xx


and a last thought

In the presence of the Lord y0ur God,
you and your families shall eat and shall rejoice
in everthing you have put your hand to,
because the Lord your God has blessed you.
Deuteronomy 12:7

Wednesday, September 23, 2009

Scor-Pal tip

Hi, For all you card craft teachers out there I thought i would share with you a tip when using your Scor-Pal to prepare your card making lessons. I find it frustrating to just dump my scor-pal down and let the ladies try and figure out and remember which lines to score on so i came up with this idea to use for those times and most of all for my own preparation of multiple cards for classes.

I have the measurements layed out in front of me on a piece of paper and then lay pieces of sticky tape over the numbers on the Scor-Pal i want to mark it at. Take a markable texta and mark over the tape at those measurements then when your finished just pull off the tape and you haven't marked your expensive score board. I find this the easiest and quickest way to mark a lot of projects that are all the same as i don't have to keep remembering all the numbers. I hope this can help you too! Now check out the pics of the dust storm we are having today....

this is looking at the Macksville bridge in our town

and this is looking down our street

these were taken earlier in the day its gotten worse since then.....that's why the scor-Pal looks a yellowy colour in the pic above lol.....most of New South Whale is covered in dust at the moment and south of us...Sydney, Canberra, etc have had it worse! check this out


this was someone Driving through the dust storm between Wilcania and Broken Hill, in NSW Australia
and a last thought
the garden of our hearts

The person who dose the planting or watering
isn't very important, but God is important
because He is the one who makes things grow
1 Corinthians 3:7

Monday, September 21, 2009

Sweet Strawberries

Spring is bringing on some yummy strawberries here so Ive made this sweet little card and box set that you could pop in a chocolate as a simple gift with your card. I made mine with the largest of the heart spellbinder nest dies and a maple leaf punch but you could also cut your own....Ive drawn up a simple card pattern here you can use if you don't have the dies and punches. Click here for the box pattern....its been around on many blogs but is not my own. I ran these through the cuttle bug with the swiss dots folder and then lightly ran my black ink pad over the raised embossing. I found this cute little butterfly dancing around on my lettuces while i was taking the pics of these. enjoy....Valita

and a last thought

And out of justice, peace. Quietness and confidence
will reign forever more.

Isaiah 32:17


Sunday, September 6, 2009

Happy Fathers Day

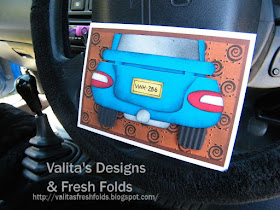
Hi to all the Dads in Australia Happy Fathers day!!.........Dave woke me at the crack of dawn and whispered lets go to the beach! so we got up and watched the sun rise as we walked along.... we found some beautiful Cowries as well ! came home and had some breakfast and had a BBQ dinner together later that day. This is the card i made for him... The Kids all chipped in and gave him enough money to get a new tow bar on the car so this was the inspiration for this card.
the tail lights were made with the small oval stampin up punch. the tow bar was made with the word window stampin up punch and the 1/2' circle punch. the wheels were the large oval stampin up punch which i cut a flat end and i ran them through a crimper. and the background was done in a similar way to my designer back ground tutorial found here. were off to a wedding tomorrow in Queensland, a 6 hour drive from our place...looking forward to spending some time together!

and a last thought

Reverence for the Lord gives a man deep strength
his children have a place of refuge and security.
Proverbs 14:26


heres a rough pattern you can adapt parts to suit your car if you like

Wednesday, September 2, 2009

Making your own designer backgound / video

Just a quick post today on how i made my own designer paper for a card front. I used the scor Pal, a cutter bee perforating tool some card stock, ink and a small stamp. Watch the video and all will be revealed!!

and a last thought

Perfume and incense bring joy to the heart,
and the pleasantness of one's friend springs
from his earnest counsel.
Proverbs 27:9

Wednesday, August 26, 2009

Paper Frangipani /pattern and video tutorial

Hey everyone, spring is peeping its head in early here in Australia, we have had beautiful weather lately and our gorgeous Frangipani tree is almost ready to burst to life again. so i thought i'd show you how to make these paper ones. Really quick and easy.

you'll need : light weight card in white and green
Yellow crayola pencil
Yellow and green ink
emboss tolls or a marble
crimper and some gliter

First cut 6 petals from white card. Using a crayola pencil starting at the point, steak on some colour and then sponge on some yellow ink.


To shape the petals i used a cake making tool with large balls on each end but you can use a marble! which will do the same job (more money savers) !

Next run around the edge of each petal with a regular emboss tool to create a small lip.

punch or cut a small disc of white card to mount your petals on. Add glue and arrange petals.


To make the bud I used my make shift deet tool (Knitting needle) and rolled the petal up starting at the top side of the petal ( note: i did this wrong in the video) ! and added some soft yellow sponged ink


Cut 1 leaf from the pattern, fold it in half length ways and run through the crimper. You could mark these vein lines with an emboss tool if you haven't got a crimper. see how i marked the Hibiscus leaves here.

arrange your flower on the card adding the bud and leaf last.

.... i hope you enjoy making this ....Valita

and a last thought

No, he has told you what he wants,
and this is all it is; to be fair and just
and merciful, and to walk humbly with your God.
Micah 6:8


Thursday, August 20, 2009

Punched xylophone /Video tutorial

Hi all, i have a cute little punch project for you to try....I was wondering how i could use my word window punch and came across a pic of a kids xylophone and it bought back a lot of memories of when our kids were little and had a ball with one of these, rainbow colours and all!! perfect project for the word window punch. so lets get started.

you'll need to punch 6 word window shapes from stampin up, in different colours.
2 strips 1/8" x 3 1/2" in black as the rails of the xylophone.
One 5/8" circle punch and a strip 1/8" x 2 1/2 " for the stick.
black or brown ink to add some shading.
and some foam tape.

To start line up all the word window punch outs miss the first one and mark a line angling down. you will use this as a guide to cut new ends.

Next place each marked punch out back into the word window punch to the pencil mark and punch a new shorter end.

Ink the edges to add some shading and assemble your pieces gluing down the black rails spacing the larger end to match your largest punch out and the thinner end to match your smallest punch out and attach each with foam tape. Glue the circle to the stick and add your finished punchart to a card. so quick and easy...hope you have enjoyed this.

I'm also having fun making the video tutorials and finally but slowly learning how to load them all on without hassling our teenage son! because i know thats how i learn best by actually seeing someone else do there craft. so I'll post a video here of how i made this...enjoy ...Valita

and a last thought

The character of even a child
can be know by the way he acts
whether what he dose is pure and right
Proverbs 20:11