Hi everyone, Happy Australia day for Wednesday all my Aussie readers we had a great day here with beautiful weather some fun at the beach and a BBQ later with family and friends. Beth is busy now preparing for her year 6 teaching prac, Ben has already done 2 weeks of his new job at the bus builders and our youngest and only child left at school goes back tomorrow into year 10. We've had some beautiful weather here lately and the beach has finally cleared of the muddy water, thank you to all those who have donated to the floods appeal please continue your prayers as people rebuild their lives. I have some exciting news... on the 26, (Australia Day) I had my first tutorial published on splitcoaststampers web site! and had a great response to it :) you can find it here in the recourse section or you may remember it from this post on my blog. So Ive been playing with my punches again..... and come up with some ideas to make flower petals with punches you normally wouldn't think to by taking advantage of the scallops and patterns on their edges. I love the build a blossom punch from the USA but our catalogue doesn't have this ..... hopefully one day they will carry these. My inspiration came from a card I see on a blog called Stamp 4 fun.net and Selene's flowers were made with sizzix dies. You could also try using different die shapes e.g. spellbinders nestibilites if you don't have some of the punches... idea from myneed2craft :)
You will find all the details below plus a video showing how I made the modern label flower petals. One last tip is this pic below, it shows how I photograph my cards, I use two 12 x 12 white card backings that come with the stampin up designer papers and lay one on the table and the other slotted into a punch that's laying on its side. This works well as a make shift card studio especially if you don't have a lot of room to keep one set up at all times!
I hope you have enjoyed this Blessings to you
and a last thought
“Get ready! This is the day the Lord will give you victory...!” (Judges 4:14)
Host a workshop of at least A$600 and you'll earn a
FREE Sale-a-Bration set in addition to
the generous hostess benefits.
( JOIN )
Join Stampin' Up! during Sale-a-Bration and
choose a FREE Stemp set from the Idea Book and
Catalogue (valued up to A$79.95)
From January 25- March 31 is Stampin ups BIGGEST sale event of the year! Offering exclusive designer Stamp sets valued at A$31.95ea (Wood Mount. Clear Mount also available), including a gorgeous set that coordinates with punches (my favorite). don't miss out on this one chance to receive these special unique stamp sets. Click on the above pic or download the flyer here and don't miss out!! :) Blessings to you
Hi all, I have a new project for sale! You will love this cute little favour box for an up coming wedding, shower, or christening. With only a few supplies needed you could easily make quite a few of these fun boxes for your guests in a short time.
These instructions are in pdf format that are delivered via download. After completing payment, you will receive an email from Fast Wagon with a link to download your purchase. If you don't receive the email, check your spam box. Contact me with any questions or issues woodyrey3@yahoo.com.au Non Australian buyers Please Pay Pal ONLY. If you are within Australia and don't have pay pal please email or phone me for bank details.If you are interested in these for workshops purposes please contact me for group rates! I know you will enjoy making these.
Hi all, Victoria now has flooding so keep those prayers coming for those areas and also for the recovery proses. Thank you so much for the many messages sent they are all appreciated. This project is one of my older iris folding patterns which Ive adapted to suit some punch art as well, very easy to do if you have never done iris folding before! All punches used are from stampin up and can be purchased here through me. I used Bashful blue ink for the clouds and the saying comes from an older stampin up set called "so many sayings". For more details you can find a folding pattern sheet for the wings here and also check the below pics.....
For the wings on these smaller hearts I have embossed some lines to help make them curved. And the below pic shows how I have shaded the main large heart.
A simple project but hopefully one you will enjoy :) sit back and watch my video.... Blessings to you
and a last thought
“Keep on asking and it will be given you;
keep on seeking and you will find;
keep on knocking [reverently] and [the door] will be opened to you” (Matthew 7:7, AMP)
Hi and thank you for the overwhelming comments on my last post its so nice to know you enjoy these projects and for your concern with the recent flooding in Australia. My nephew in Brisbane has been evacuated from his house, i'ts under and Ive been in contact with my brother who lives in Toowoomba and they are all safe thank the Lord! there house is higher up out of the central business district where it was hit bad but they have his mother in law living with them who did get flooded out badly, they all still need our prayers. The heavy rain is coming down south, Grafton which is 3 hours from us is having major flooding and has the main highway cut off and our water ways are very full now too so if it keeps raining we too will have flooding in our valley. I also did my first day of motel cleaning which was hard work but im just so happy to have work and be able to help my family financially :)
On an lighter note this is the dress version of my heart punch lady, it would be a great wedding card of course lol or even a graduation or special anniversary / evening celebration card. The rolled rose was done with the 1-3/4" circle punch cut in a spiral and rolled around similar to my rolled scallop rose tutorial.
The dress was made using the largest scallop circle from the large scallops nestabiblity dies set, with a piece cut from either side pic below....
I embossed the skirt with the sun rays folder from craft concepts which i bought off eBay... not sure who else sells them But you could use another pattern or just leave it plain. And this is the card i made for someone special getting married soon hence the colour scheme.
For all the details on the bodice part of the dress plus shading ideas please refer back to my valentine heart punch couple post now sit back and enjoy my video :)) Blessings to you
and a last thought
“Now faith is the substance of things hoped for,
the evidence of things not seen” (Hebrews 11:1, KJV)
Hi and welcome back to my first post of 2011. I hope you all have had a lovely Christmas and new year, we had a quiet Christmas with my parents and brother with his family and an even quieter new year. Both Dave and I have had Birthdays is this space of time and things have been busy working our cleaning job a part of each day and then fitting in some family holiday time together as well...... also some very frustrating things have happened which have really challenged me to see my faults and work towards making life happier not just for me but my whole family. Our Daughter Beth is doing summer camps for 2 weeks as counselor, Ben is being fitted up for his new job plus helping Dave and I with our cleaning job and Madaleine has had some good work over the holidays and then off to summer camp herself for a week as camper before she starts back at school again...... January is flying already! also letting you know we do not live near all the devastating flooding happening in Australia at the moment, that is a lot farther north but my brother lives up there and they need all our prayers very badly!
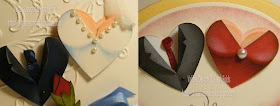
My first paper craft idea for the year is a Valentine/wedding idea. All you need is the large heart punch, large tag punch and a 1' circle punch, these can be purchased through me from stampin up. So quick and easy to do! To make both couple you will need 4 hearts & 2, 1"circles. For the man cut a 2cm or just under 1" slit down from the top of the heart, don't go all the way through. Bend back each side to form the jacket opening and cut a small wedge from each side. Ink the edges and add a small button with a spot of black maker then a small blob of crystal effects. For the lady punch from the top the large tag punch to form the neck line ( see below pic). punch 2 scrap 1" circles and tape these together these will be a mask to do some darker shading under the chest area. Next punch another two 1" circles to create the lighter shading with white on the chest. see below pic
Put the dress aside and with small foam dots attach the 2, 1" circles to the skin coloured heart... about 1/8 0f an inch from the top. glue the dress over the top .
Stamp sentiments used were from the set "well scripted" from stampin up.
Do the same for the wedding card only using different colours, here I used bashful blue and the below pic has details on how i made the veil, punched the neck line and rose bud. I have also made a full wedding dress using this idea so stay tuned form my next post :) now sit back a watch my video. Oh and thank you all those who have subscribed to my YouTube channel i now have over 1000 subscribers wwoo hooo :)) Blessings to you
and a last thought
The LORD make His face shine on you, And be gracious to you; The LORD lift up His countenance on you, And give you peace.’